mountain bike

Mastering the Fundamentals - Elbow Position

1-97.jpg

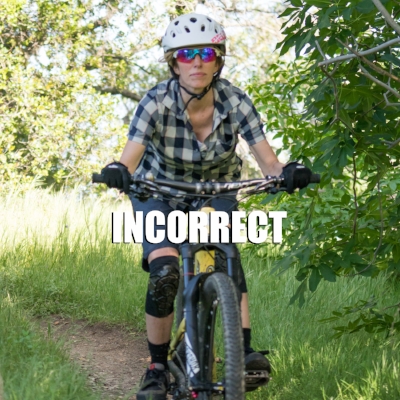
Mastering the fundamentals is important in both learning how to ride a mountain bike properly and continuing to improve your skills.  Elbow position is one of the keys to help control your bike in all aspects of riding including corning, conquering technical terrain and descending.  Let's talk about the correct elbow position versus the incorrect position.


Actually, having correct elbow position happens almost automatically if you have good body position on the bike.  Once out of the saddle get into a proper neutral position by making sure your knees are slightly bent, head up, eyes forward, heels slightly down and elbows away from your side.  Once in this position it is really difficult to have your elbows in the wrong position unless you purposely move them. 

correct.jpg
incorrect#2 copy.jpg


Moving your elbows to in toward your sides or moving them up and forward in an exaggerated position puts your arms in a weak position and does not allow you to engage all the core muscles needed in order to maintain control of your bike. 


incorrect copy.jpg

Having your elbows in a neutral or middle position once out of the saddle puts you in a strong dynamic stance that allows you to exert the push and pull forces on the handle bars for correct cornering and allows you to maintain control when the trail gets rough. 


You can easily make sure you are in the correct position by having someone take a picture of you riding around.  Take multiple pictures from different angles including the front, rear and side.  Once you are sure you have the correct position, practice it over and over until it comes natural so you won’t have to think about it when out on the trail.

Now keep learning and practicing your core mountain bike skills and we will see you out on the trails. 
How to Choose The Right Mountain Biking Helmet

helmet.jpg

There is no other thrill like riding your bike down some single track, carving turns, feeling the wind on your smiling face and experiencing the flow that gets the heart racing.  Things can happen fast at high speeds so being prepared in the event of a crash can be the difference between dusting yourself off versus weeks on the couch.  One of the most important pieces of safety equipment is your helmet. Let’s talk about some important information when looking for the right helmet. 

First get a quality Mtb specific helmet!  This is one piece of equipment you should not skimp on price.  Quality Mtb helmets can be expensive but there is good reason; they are made of durable and light materials, tested for fit, designed for breathability at low speed and crash tested based on possible impacts specific to the sport.  You can tell a MTb helmet from other helmets by their visors, multiple air vents, enhanced coverage at the rear of the head and secure fit when riding through rough terrain. 


Here is some additional information about Mtb helmet design:

Ventilation: Helmet vents enhance wind-flow over your head, keeping you cooler and more comfortable as you ride. The more vents you have, the lighter the helmet, too.

Visor:  Visors help shield the sun, are removable and have a break-away system in the event of a crash.  Plus the just loo cool!

Full-face protection: Some mountain bike helmets have a wraparound chin bar (removable or not) to provide face protection for downhill mountain biking, super sketchy single track and park riding.

Straps: The strap system should be comfortable and easy to buckle and unbuckle.

Hair port: Some helmets come with a strap design that accommodates ponytails.

helmet-2.jpg

When choosing a bike helmet looks matter (of course we want to look good out on the trail) but fit is the most important component when choosing a helmet.  Most helmets come in small, medium, large and when on should be tight to the point where you have to really force the helmet to move from side to side. 

 Most helmet manufactures will have a sizing chart on their website that is based on the circumference of your head.  To find your size wrap a flexible tape measure around the largest portion of your head (about 1 in. above your eyebrows) and compare that measurement to corresponding size chart. 

granite bay porta pushed.jpg

Any helmet involved in an accident is likely to get damaged even if you can’t see it with the naked eye.  So replace the helmet after any significant impact, even if everything looks OK.  It is generally recommended to replace your helmet after 5 years as pollution, UV light and weathering can weaken its components over time.

Now go out and get a sweet helmet that looks cool, fits great and protects your dome for years to come.  See you out on the trails….